TL;DR: Full code can be found at https://github.com/nitinankad/imessages-bot
- Note: This project is just for educational purposes only and should not be used for spamming messages or anything that breaks Apple’s ToS. Use the code at your own risk.
Introduction
I’ve been writing chatbots for a while now, starting with bots on xat.com in 2012. That’s also how I ended up getting into programming and I’ve been hooked ever since. As of lately I’ve been playing around with Discord bots using serverless technologies on AWS (which I can write a separate blog post about) and somewhere during that process I thought to myself: What if it’s possible to do the same thing via SMS?
The Brainstorming
Initially I had no idea how this would work. I used Claude Code to brainstorm some possible ideas for this project and here’s an overview of the different approaches.
Approach 1: WhatsApp messages
I’m in a WhatsApp group with some friends so my first instinct was to see if WhatsApp offers any APIs for automation. I realized I had a cheap Motorola Moto 5G Android phone that I got some time back so I got a cheap eSIM from Tello and registered a new WhatsApp account with it. I asked Claude about potential approaches for setting up a bot on WhatsApp and it suggested using @whiskeysockets/Baileys. I went through the auth process by using the Linked Devices feature on WhatsApp and got it working. It felt like this could be improved though. I didn’t want to restrict the bot to only WhatsApp so I wanted to try something different.
Approach 2: SMS/MMS text messages with Android
In the next approach I reused the same Android device I had but I wanted to see if it’s possible to intercept SMS/MMS messages from the phone using a Python script since Android lets you use a terminal. Going through the hassle of importing a custom script to the phone didn’t seem worth it, especially for updates, so I put together a custom Kotlin app that used android.content.BroadcastReceiver to listen for text messages. The config XML code for it was as follows:
<receiver
    android:name=".SmsReceiver"
    android:exported="false"
    android:permission="android.permission.BROADCAST_SMS">
    <intent-filter android:priority="999">
        <action android:name="android.provider.Telephony.SMS_RECEIVED" />
    </intent-filter>
</receiver>
It wasn’t working for some reason and soon I realized that the text messages I was sending from my iPhone to the Android were RCS messages, not SMS. They were going to Google Messages. To get past this I asked Claude Code about alternative approaches and it suggested to intercept the notifications from Google Messages to read the incoming text messages. Genius.
Sadly since these were coming through Google Messages it didn’t seem possible to send messages programmatically. I tried switching from Google Messages to an Android SMS Gateway app from the Play Store which had an endpoint for sending messages but it did not support group messages which was one of the main requirements I wanted.
Approach 3: Using iMessages to get rid of green bubbles
In addition to not being able to send group messages, there was something that I absolutely hated: Green bubbles. I’m a long time iPhone user so the blue bubbles was what I was more used to. Cue Android vs iPhone debate.
After some research I found out that it’s possible to use a Mac to send iMessages without having another iPhone with a separate phone number. Luckily I had a spare Macbook Air sitting around that I could use for this experiment. It’s possible to use an app called BlueBubbles to setup a webhook that triggers on events like getting a new message and also hitting an API endpoint to send a message to a given chat GUID.
At a high level, this is what the architecture looks like:
graph LR
    iMsg(["📱 iMessage"])
    BB["BlueBubbles\n(Mac)"]
    Bot["Flask Bot\n(port 8080)"]
    AI["Abliteration AI\n(!chat)"]
    RH["RunningHub\n(!t2i / !t2v / !i2i / !i2v)"]
    S3["AWS S3\n(image staging)"]
    iMsg <-->|iMessage protocol| BB
    BB <-->|webhook + REST API| Bot
    Bot -->|chat completions| AI
    Bot <-->|generate & poll| RH
    Bot <-->|temp upload / delete| S3
    RH -->|fetch input image| S3
Where t2i is text to image, t2v is text to video, i2i is image to image and i2v is image to video. An uncensored AI model API was used just to spice things up a little bit with the chat command. AWS S3 is needed so that images sent by the user can be temporarily served to the AI inference API for images/videos via a presigned URL.
Initial Setup
Note: The code in this blog post are simplified for brevity. Please look at the Github repository for a working example.
First, get BlueBubbles and set it up on a Mac. Setup instructions are straightforward. Main thing you need to do is to make sure that the iMessages email matches the account you’re trying to send messages from and setup a webhook for it.
Bot Webhook
For the webhook I started with a Python Flask API for it:
import os
import hmac
import hashlib
import logging
import random
import time
import threading
import uuid
from flask import Flask, request, jsonify
from dotenv import load_dotenv
import requests

load_dotenv()

logging.basicConfig(level=logging.INFO, format="%(asctime)s %(levelname)s %(message)s")
log = logging.getLogger(__name__)

app = Flask(__name__)

BB_URL = os.environ.get("BB_URL", "http://localhost:1234")
BB_PASSWORD = os.environ.get("BB_PASSWORD", "")
WEBHOOK_SECRET = os.environ.get("WEBHOOK_SECRET", "")
PORT = int(os.environ.get("PORT", 8080))
COMMAND_PREFIX = os.environ.get("COMMAND_PREFIX", "!")

COMMANDS = {}

_THINKING = {
    "t2i": ["Painting...", "Rendering...", "Dreaming up pixels...", "Conjuring visuals...",
            "Hallucinating art...", "Consulting the muse...", "Smearing paint..."],
}

def command(name: str):
    def decorator(fn):
        COMMANDS[name] = fn
        return fn
    return decorator


# --- Commands ---

@command("ping")
def cmd_ping(args, sender, chat_guid, msg_guid, attachments=None):
    return "pong"


@command("help")
def cmd_help(args, sender, chat_guid, msg_guid, attachments=None):
    return "Commands: " + ", ".join(f"{COMMAND_PREFIX}{c}" for c in sorted(COMMANDS))


# --- Webhook ---

def verify_signature(payload: bytes, signature: str) -> bool:
    if not WEBHOOK_SECRET:
        return True
    expected = hmac.new(WEBHOOK_SECRET.encode(), payload, hashlib.sha256).hexdigest()
    return hmac.compare_digest(expected, signature)


def handle_new_message(data: dict) -> None:
    msg = data.get("data", {})
    text = (msg.get("text") or "").strip()
    is_from_me = msg.get("isFromMe", True)
    chat = msg.get("chats", [{}])[0]
    chat_guid = chat.get("guid", "")
    msg_guid = msg.get("guid", "")
    attachments = msg.get("attachments", [])

    if is_from_me or not chat_guid or not text.startswith(COMMAND_PREFIX):
        return

    sender = msg.get("handle", {}).get("address", "unknown")
    body = text[len(COMMAND_PREFIX):]
    name, _, args = body.partition(" ")
    name = name.lower()

    log.info("Command %r from %s in %s (args=%r)", name, sender, chat_guid, args)

    handler = COMMANDS.get(name)
    if handler:
        reply = handler(args.strip(), sender, chat_guid, msg_guid, attachments)
    else:
        reply = f"Unknown command: {COMMAND_PREFIX}{name}. Try {COMMAND_PREFIX}help"

    if reply:
        send_message(chat_guid, reply, reply_guid=msg_guid or None)


@app.route("/", methods=["POST"])
def webhook():
    raw = request.get_data()
    sig = request.headers.get("X-Signature", "")
    if WEBHOOK_SECRET and not verify_signature(raw, sig):
        log.warning("Invalid webhook signature")
        return jsonify({"error": "forbidden"}), 403

    payload = request.get_json(silent=True)
    if not payload:
        return jsonify({"error": "bad request"}), 400

    event_type = payload.get("type", "")
    log.info("Received event: %s", event_type)

    if event_type == "new-message":
        handle_new_message(payload)

    return jsonify({"status": "ok"})


@app.route("/health")
def health():
    return jsonify({"status": "ok"})


if __name__ == "__main__":
    log.info("Starting iMessages bot on port %d (prefix=%r)", PORT, COMMAND_PREFIX)
    app.run(host="0.0.0.0", port=PORT)
After running this, note down the endpoint that it’s running on (ex: http://192.168.1.2:8080/) and put the endpoint into BlueBubbles where it says API & Webhooks on the left side nav. You should be able to see incoming messages from your iMessages account.
Adding AI Capabilities
Now for the fun part: Adding some AI functionality to the bot. For the sake of this blog post I’ll keep it to only a couple of commands.
The first command is !t2i where you can pass in a prompt and it will output an image in return. In this bot I used the RunningHub API for generating images and videos. !t2i will use Nano Banana to generate the images. Running local models for image and video generation can take more than 1 hour sometimes, even on a powerful machine like the MacBook Pro M5 Max with 128 GB RAM. To implement !t2i, we need to take in a prompt from the user (aka the text that comes after the !t2i command). We can setup a new command in the webhook script as follows:
@command("t2i")
def cmd_t2i(args, sender, chat_guid, msg_guid, attachments=None):
    if not args:
        return f"Usage: {COMMAND_PREFIX}t2i <prompt>"
    if not RUNNINGHUB_API_KEY:
        return "Image generation is not configured (missing RUNNINGHUB_API_KEY)."
    _run_generation(
        lambda: _rh_post(RUNNINGHUB_T2I_ENDPOINT, {"prompt": args, "aspectRatio": "1:1", "resolution": "1k"}),
        chat_guid, msg_guid, "Image generation",
    )
    return f"> {args}\n{random.choice(_THINKING['t2i'])}"
Make sure to create a .env file with the RUNNINGHUB_API_KEY set to your RunningHub API key.
Add the _run_generation() function:
def _run_generation(submit_fn, chat_guid: str, msg_guid: str, label: str, s3_key: str | None = None):
    def generate():
        try:
            task_id = submit_fn()
            _poll_job(task_id)
        except Exception as e:
            log.error("%s error: %s", label, e)
            send_message(chat_guid, f"{label} failed: {e}", reply_guid=msg_guid or None)

    threading.Thread(target=generate, daemon=True).start()
Add the RunningHub API:
RUNNINGHUB_BASE = "https://www.runninghub.ai/openapi/v2"
RUNNINGHUB_T2I_ENDPOINT = f"{RUNNINGHUB_BASE}/rhart-image-n-g31-flash/text-to-image"
RUNNINGHUB_QUERY_ENDPOINT = f"{RUNNINGHUB_BASE}/query"
POLL_INTERVAL_SECONDS = 5
MAX_POLL_ATTEMPTS = 60


def _rh_post(endpoint: str, body: dict) -> str:
    resp = requests.post(
        endpoint,
        headers={
            "Authorization": f"Bearer {RUNNINGHUB_API_KEY}",
            "User-Agent": "imessages-bot",
        },
        json=body,
        timeout=30,
    )
    resp.raise_for_status()
    result = resp.json()
    log.info("RunningHub submit %s: %s", endpoint, result)
    task_id = result.get("taskId")
    if not task_id:
        raise ValueError(f"No taskId in response: {result}")
    return task_id


def _poll_job(task_id: str) -> str:
    for attempt in range(MAX_POLL_ATTEMPTS):
        time.sleep(POLL_INTERVAL_SECONDS)
        resp = requests.post(
            RUNNINGHUB_QUERY_ENDPOINT,
            headers={"Authorization": f"Bearer {RUNNINGHUB_API_KEY}", "User-Agent": "imessages-bot"},
            json={"taskId": task_id},
            timeout=15,
        )
        resp.raise_for_status()
        body = resp.json()
        log.info("RunningHub poll %d: %s", attempt + 1, body)
        status = body.get("status", "")
        if status == "SUCCESS":
            results = body.get("results") or []
            if results and results[0].get("url"):
                return results[0]["url"]
            raise ValueError(f"SUCCESS but no result URL: {body}")
        if status not in ("RUNNING", "PENDING", "QUEUED"):
            raise ValueError(f"Task failed status={status!r}: {body}")
    raise TimeoutError(f"Task {task_id} timed out after {MAX_POLL_ATTEMPTS} polls")
All of this code is creating a separate thread per incoming request to make an API call to RunningHub and poll the results. This could be improved a lot by making use of the webhookUrl that you can pass into the RunningHub API and get a response when the generation is complete.
Conclusion
And that’s all! Here is how it looks like in action:
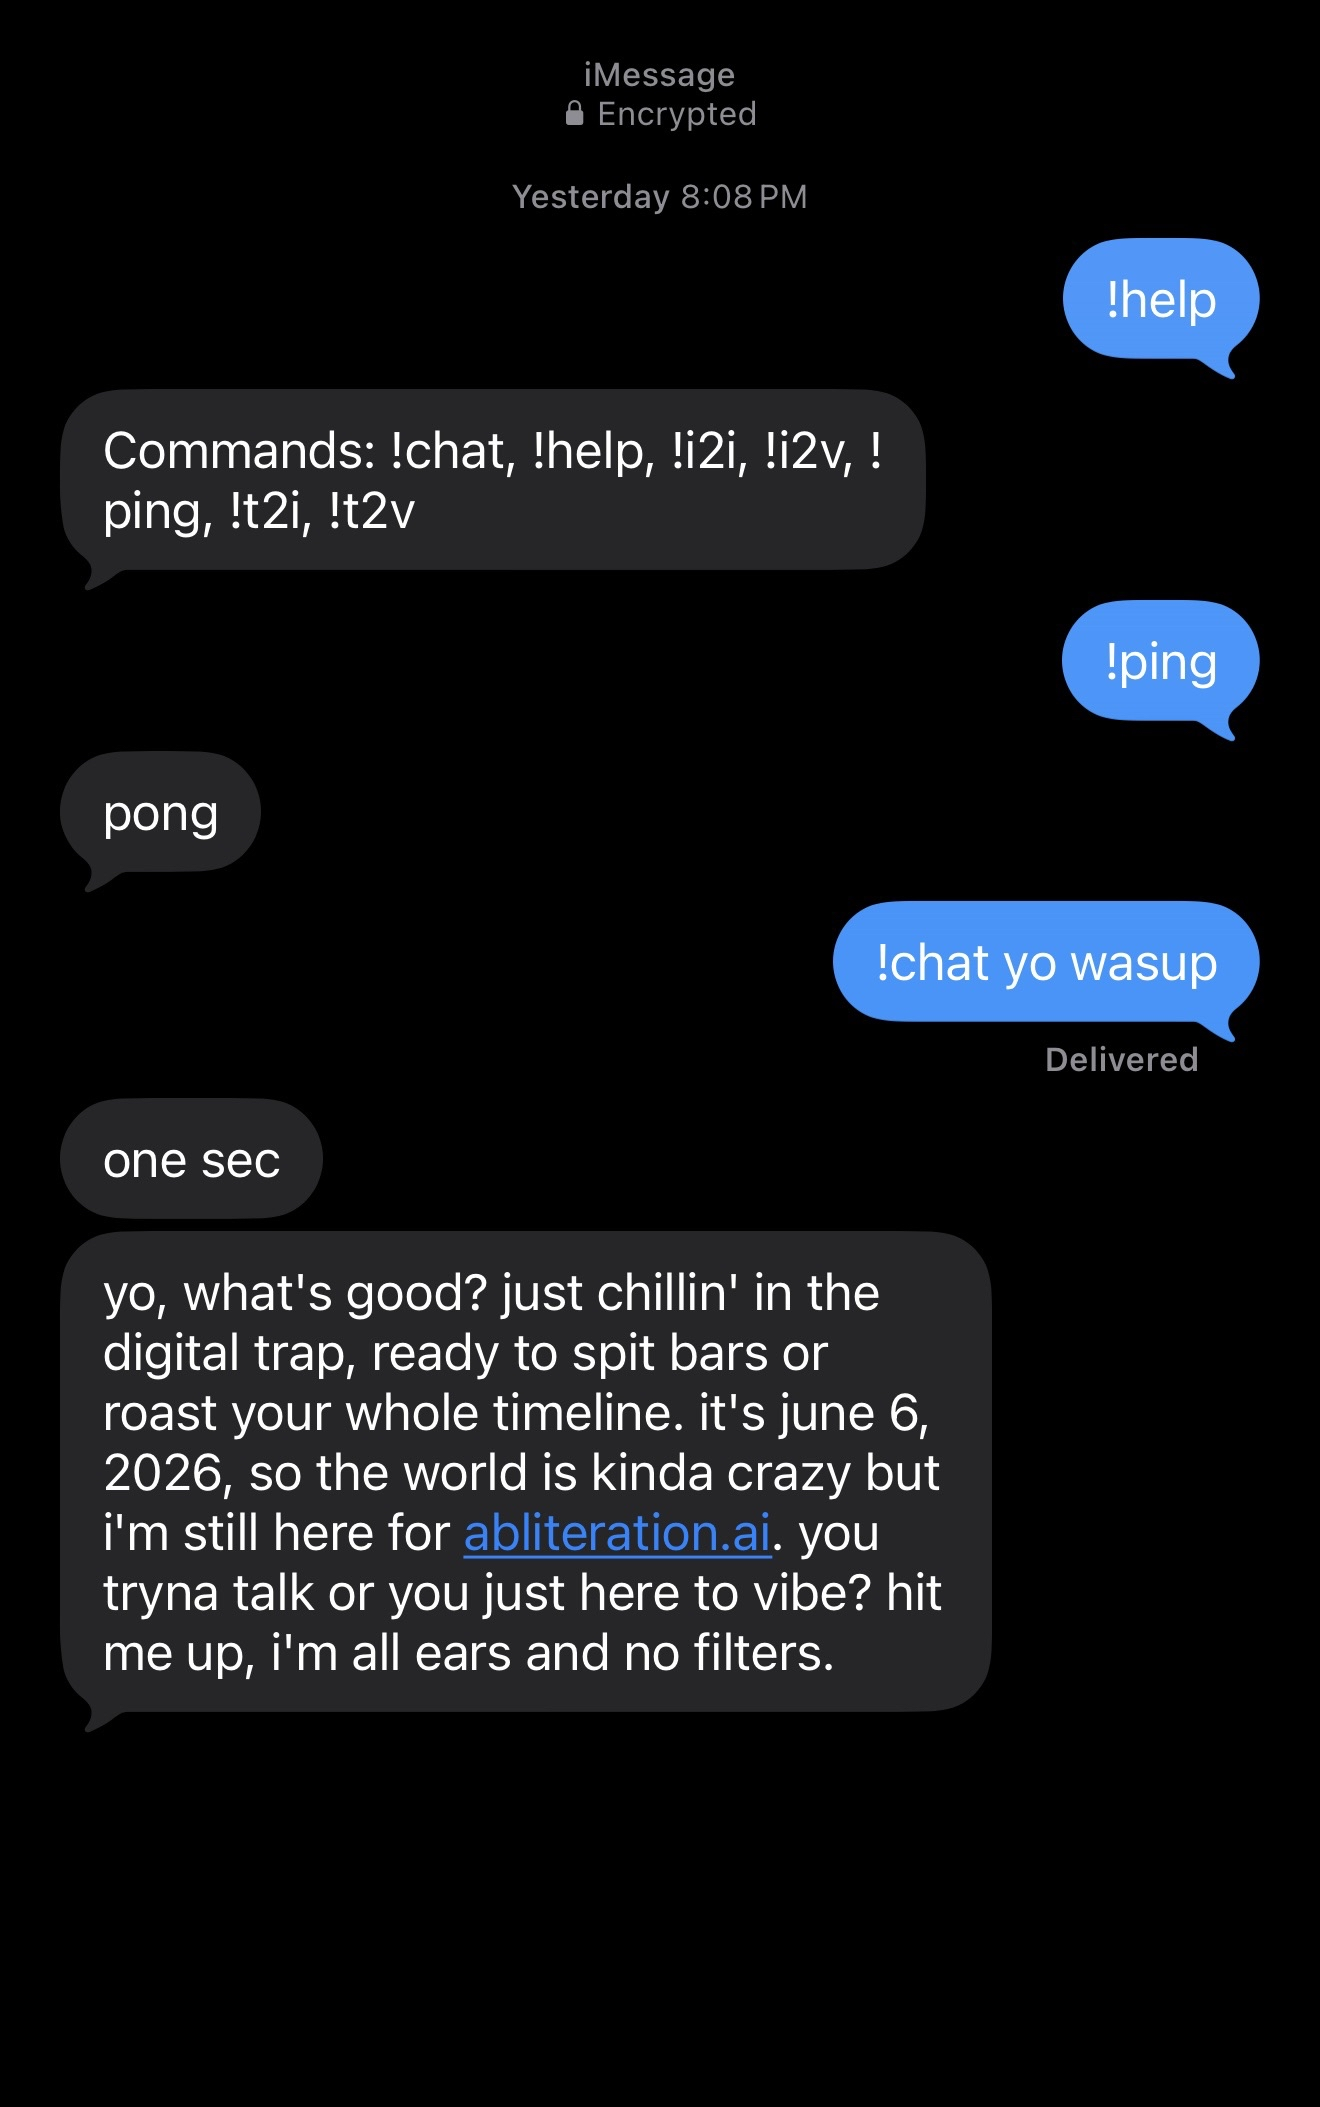
The full code can be found at https://github.com/nitinankad/imessages-bot.
This is my first blog post so all feedback and comments are welcome! If you have any questions or comments feel free to leave them in the Comments section below or email me at [email protected].